Process of Making
To make the circle Brooches, I started by cutting seven 17.5 cm by 0.5 cm strips on the guillotine. I soldered these to create a ring. When I previously experimented with brooch pins, I liked the design of having the pin attached at the top of the brooch. To be able to do this, I drilled holes at this stage, because it would be a lot more difficult later on. I then used enamel solder to solder onto the sheet metal, followed by using the bandsaw to cut as close to the perimeter as possible. I then filed down the edges to create smooth edges. Unfortunately, I noticed at this stage that one of the brooches wasn't circular but more oval. I believe I didn't notice this error before soldering onto the sheet of copper.

Holding metal in place ready to drill holes

Holes drilled for Brooch pin

Bezels soldered onto sheet, not enough solder

All bezels soldered onto bases.

Soldered and cut out with Bandsaw

Comparison of shapes. Left piece not round
After researching methods to make a square-shaped bezel, I made two squares for my final pieces. At this stage, these worked out well, as shown below when measuring with an engineer's square tool.
I followed the same steps with these as I did with the circle brooches. Followed by applying a permanent marker onto the sides and using sandpaper to create flat edges, knowing when it is all level when the marker is removed. Unfortunately, the technique I was using to do this wasn't as accurate as it could have been. By sliding the piece across the sandpaper, I was creating slightly curved edges without realising it because of the motion I was using.

Square bezel being measured in engineers square

Square bezel being measured in engineers square

Square bezel being measured in engineers square

Square bezel being measured in engineers square

Not enough solder

Piece soldered properly

Permenant marker on side to sand flat

flat side and side to ready to sanded
Next, I filed and sanded the pieces further to create smooth edges. When shaping the circle rings, I used a stake which was tapered, as this was the only option for the size I wanted. Unfortunately, this led to the edges not being 90 degrees straight. To fix this, I filed a lot while checking using the engineer's square. After this, I used radial discs to remove excess solder on the inside joints.

All pieces cut out with bandsaw

Filing pieces

Checking angel with engineers square

Using radial discs to clean solder joints
The next step was to draw on the cracks and cut them out using a piercing saw. I then filed and sanded the inside of the cracks using narrow strips of sandpaper to smooth some of the sharper edges and minimise the enamel cracking under tension.
After this, I soldered on mechanisms for the pins onto the brooch. I used copper tube and partially flattened copper wire for this. For some of the brooches, I added a platform made from sheet copper, which meant the mechanism is away from the edge of the brooch, creating a tidier brooch pin back. To hold these mechanisms in place when soldering, I used scrap steel to prop them up.
After soldering all the mechanisms on, I added pins using a brass rod. Followed by removing them and measuring the length of each pin. This is because when I get steel rod gold plated, I won't be able to grind or polish them to create the point, meaning when I send the steel off for the gold plating service, they will have to be ready.

Cracks drawn on ready to be pierced out

Holding hook with third arm

Using steel scrap to hold pieces in place for soldering

Soldering on components for the brooch pins

Adding Brass rod to measure brooch pin length

After soldering on hooks for pins to sit

Square brooch pin back

Side angle of brooch back

Damaged unusable tube

Removing tube from brooch

All finished brooch pin backs, with rod
At some point, I noticed that the tube for one of the brooches had been damaged. I cut the tube off using a piercing saw and soldered on a new piece to fix this.
To make the steel pins, I used a digital calliper for accuracy and a flat grinding stone, securing my Dremel in a vice. This setup ensured I could achieve the correct angles to create a precise point on the pins.

Measuring steel rod

Set up Dremel to grind down pin points
At this stage, the pieces are ready for enamelling. To prepare the enamels, I refine them using a 250-mesh sieve and wash them to remove the fine powder, which improves the clarity of the enamel. After that, I add a few drops of Klyr-Fire Gum Solution to help the enamel adhere during firing. I apply the enamel with a paintbrush and repeat the process until the cells are filled.

Enamels washed and ready to start filing in cells

Enamel added to piece

Filled cells with two colours

Filled cells with one colour
Plating Services
The Folklore Foundary
I used a gold-plating service by The Folklore Foundry to get the steel rod pins plated. This was an easy process, and I was happy with the service and product.
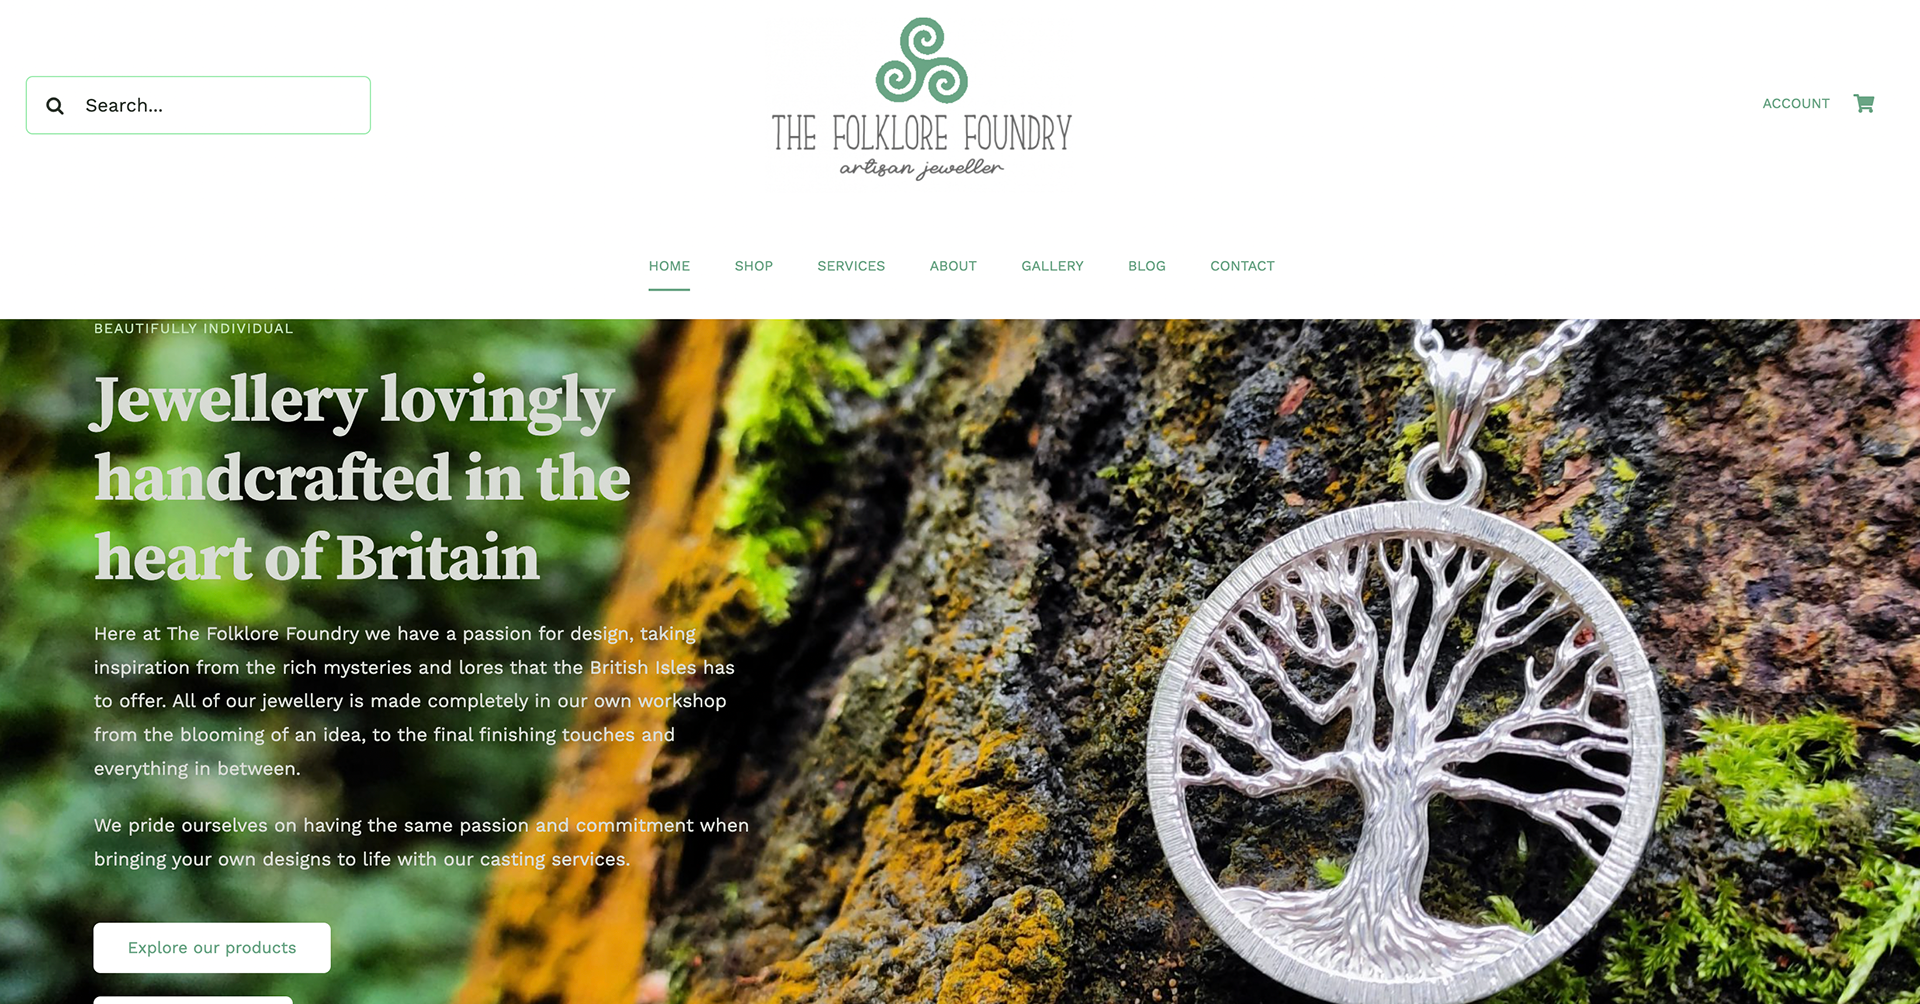
Folklore Foundary home page

Gold Plated pins
Elliot Fitzpatrick
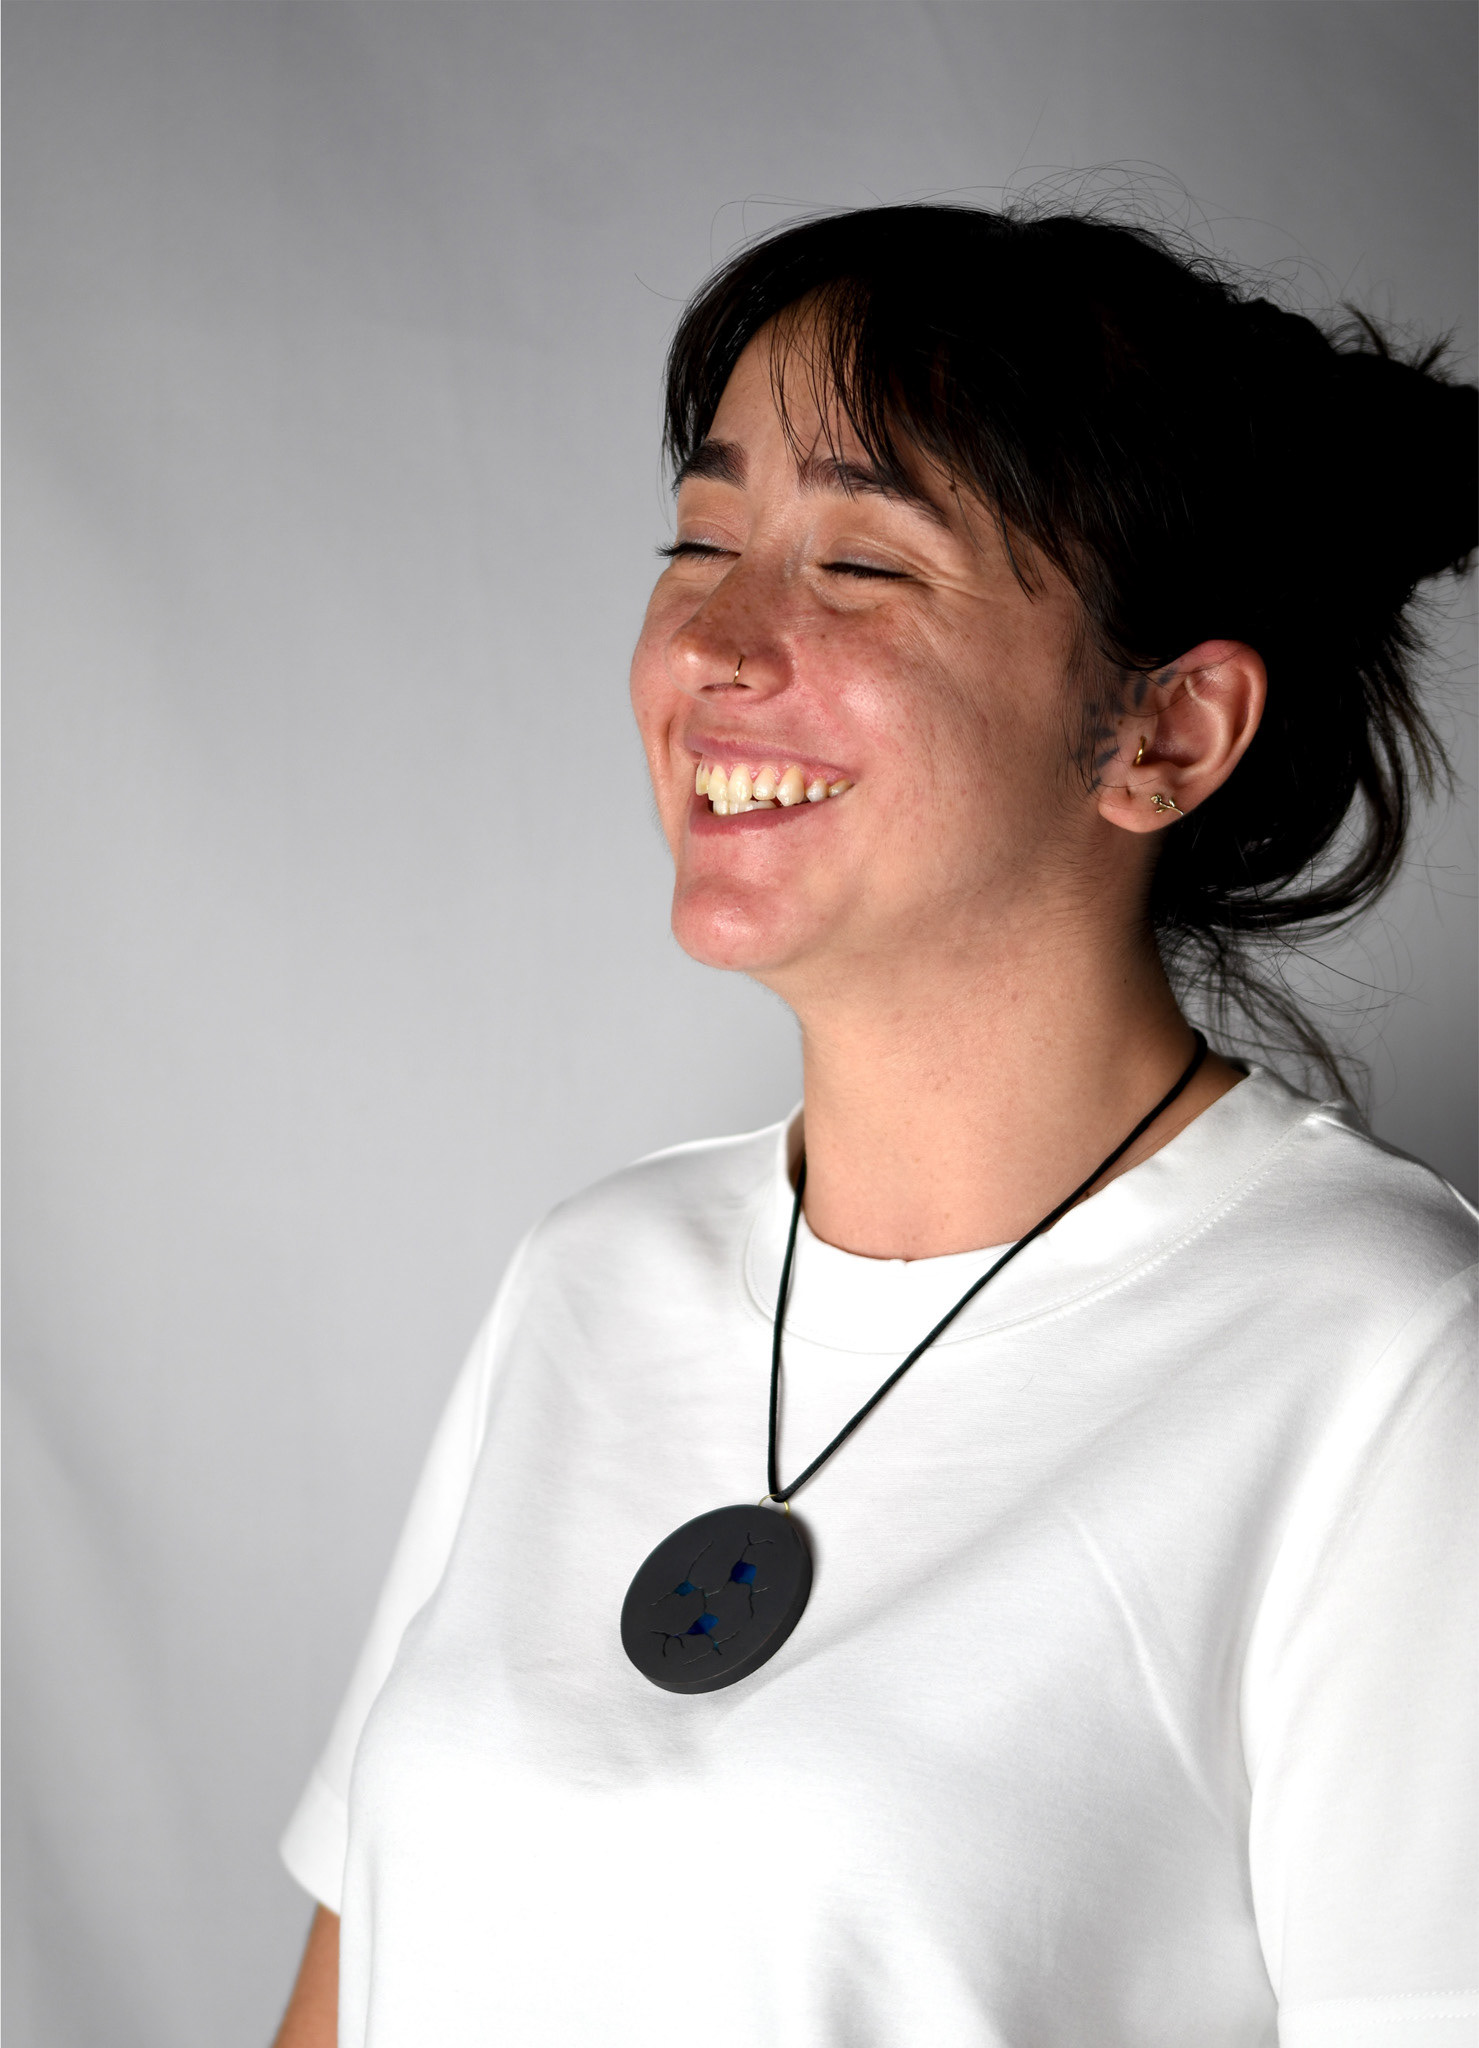
Towards the end of my project, I came across Yenna Yoon, whose work has a matt black finish. I researched into what the finish was and where she got the service done, and discovered that it was done by Elliot Fitzpatrick.
The process is Black Ruthenium Plating. After reading about this on the website, it sounds more durable than oxidising, and it can achieve the finish I would like. Unfortunately, I discovered this at the end of my project as this would of been perfect. I have enquired with further questions about the process.
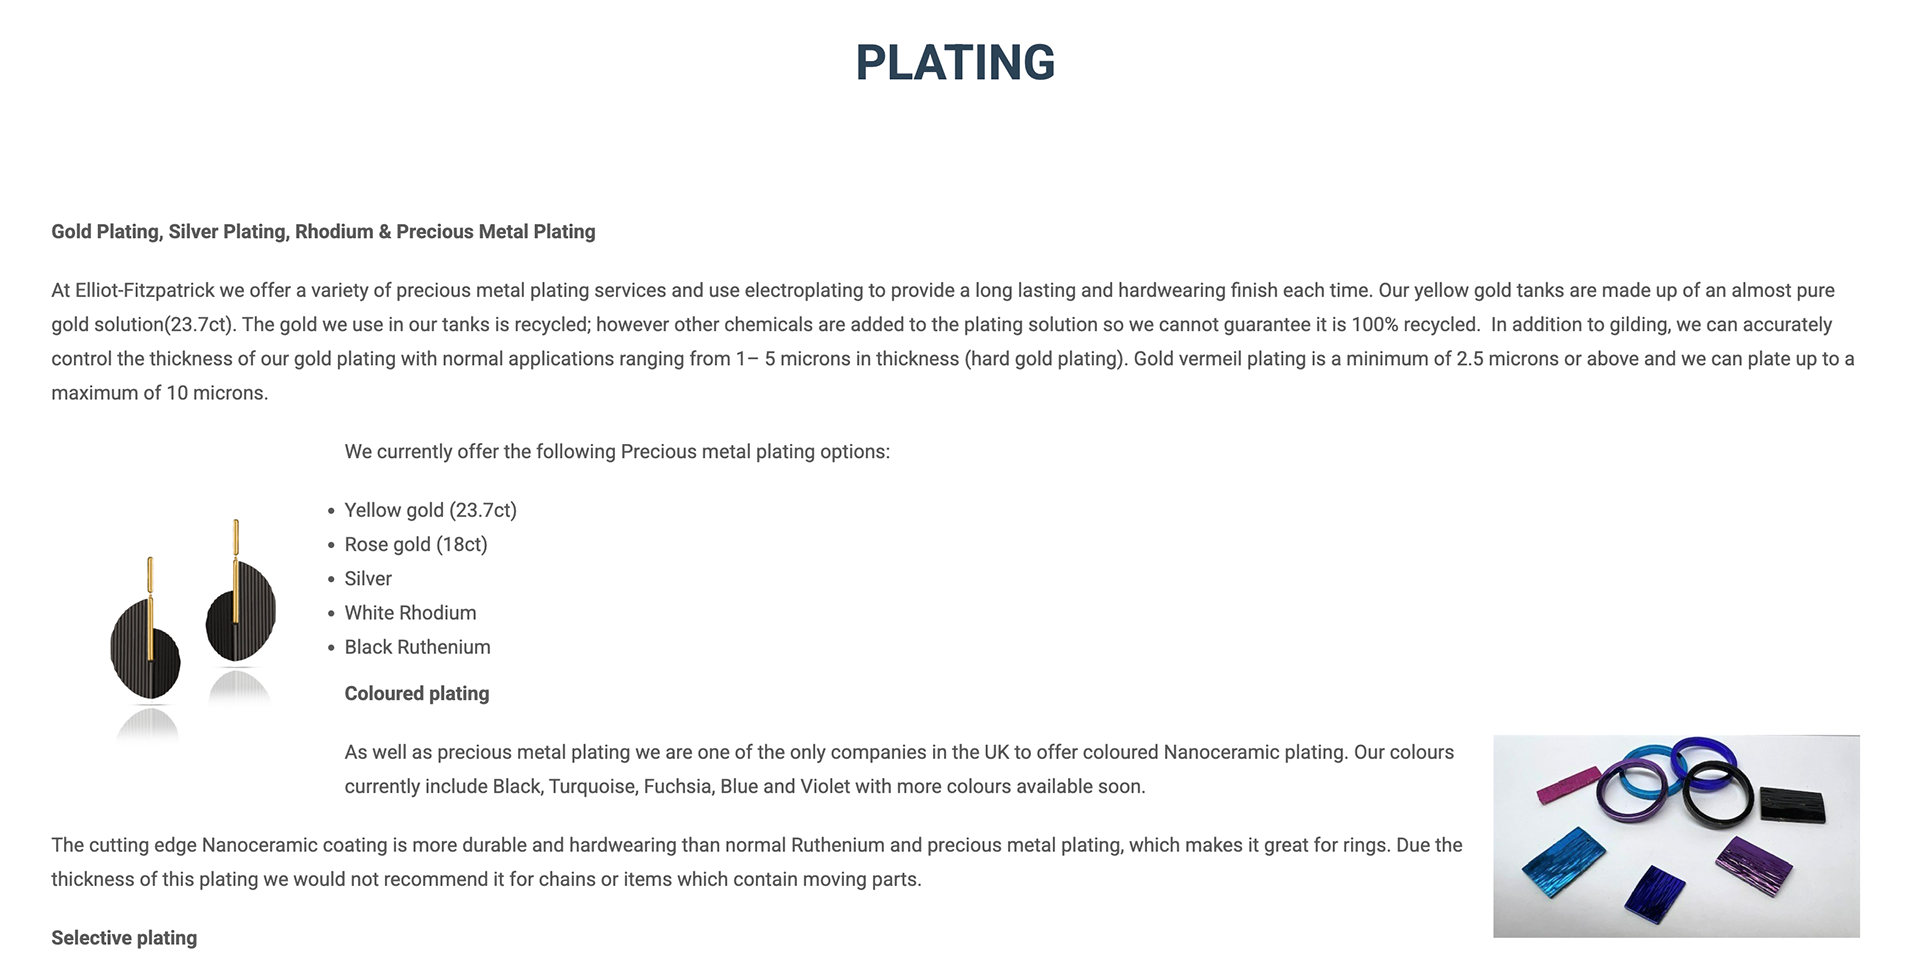
Plating page on website

email communication
I received a response regarding the Ruthenium plating. Due to the heat applied, it is not recommended to do this plating with enamel. However, Nanoceramic was suggested as a better option, which I will consider in the future.
Process Continued
After finishing filling the cells with enamel, I needed to clean up any excess on the metal surface. To do this, I used a combination of various tools. These included diamond burrs, rubber burrs, radial discs, sandpaper and a alundum stone. I found using the diamond burrs followed by radial discs the most effective tools. I used these to grind down the enamel to the same level as the surface and clean up the excess.
However, some of the designs involved keeping the excess enamel on the edges. Despite this, I still ground the excess down, but not to the point of being clean, only until it was smoother and flatter.

Brooches ready to be cleaned up

After grindind down the enamel

Leaving excess enamel
Unfortunately, I put one of my pieces in the kiln, got distracted doing something else with another piece, and forgot about it. Once I took the piece out of the kiln, the pin mechanisms popped off as it was cooling, followed by the form coming apart. I believe this is because the solder got too hot and melted away. The enamel also burned on the narrower parts; however, in the bigger cells, the enamel had a nice effect. It was clear and bright. Because of this, I reflected on the temperature I usually fire at and wondered if I should fire at a higher temperature to help the clarity. This is something I could test out in the future.

Burnt piece straight out of the kiln

Tubes which popped off

solder ran out of joint

piece held upto the light

fallen apart piece

clean piece held upto the light
Fortunately, when I was at the beginning of the process, I made an extra piece. This meant I didn't have to start again from the beginning. For the replacement piece, I had to start by piercing out the cracks. Followed by soldering on the mechanisms for the brooch pin, and the further steps to get this piece up to the same point as the others.

Holes drilled ready to be cut out

Pierced out piece

Ready to solder mechanisms
After fixing the first error and enamelling all of the pieces. The next step was to sandblast the pieces. Unfortunately, when going to sandblast, someone had turned the pressure up, and it damaged my piece by bending the metal. When being inducted to the sandblast machine, checking the pressure or anything to do with this isn't mentioned, and whenever I have used the machine previously, the pressure has always been the same. Therefore, I didn't think to check this.
To fix this, I had to hammer the metal flat, which then shattered the glass a lot, resulting in it falling out. I then had to refill the cells with enamel and start this part of the process again.

Damaged piece from sandblaster

Damaged piece from sandblaster
After fixing the previous issue, another issue occurred. I noticed all of a sudden that the tubes on another piece had come off. I am not sure when this happened or how. This was a problem because soldering after I had added the enamel is difficult, as the heat from the flame can damage the glass.
Just after this, I noticed the platform on one of the square brooches had cracked and would eventually fall off. To fix these, I tried something I hadn't done before. For the circle brooch, I used Techno Flux and was careful with where I pointed the flame when heating. I also let this cool slowly rather than quenching as I normally would after soldering to avoid the glass shattering. Unfortunately, when it had cooled, I realised the Technoflux had stuck to the glass. I tried to grind this off, but I was worried it got into the glass, so I decided to smash the glass out and start the enamelling process again with this piece.
However, when attempting the resolder the broken part on the square brooch, I put Mica paper underneath the Technoflux as Mica paper doesn't stick to the enamel. This worked a lot better and the glass was fine.

Piece missing tubes

Cleaned up piece

Set up ready to solder

Technoflux stuck to enamel

Set uo ready to be soldered

Piece after re soldering joint and cleaned up

Front of piece undamaged
The next problem which occurred was that the sandblast machine had broken. Most of my pieces were at this stage, so I was really stressed with this, after dealing with the other errors going wrong in the same week. The technicians weren't sure when it would be fixed. Luckily, it was fixed the following day. I managed to get all of the pieces ready for sandblasting and did this. Even though the sand blaster was on a low pressure, it misshapen the square brooches in particular. This was frustrating, and I tried to reshape them the best I could.
After sandblasting, I have to re-fire the pieces to fuse the glass back together and make the glass transparent again. This was successful for all pieces except one. The enamel dropped out of one of the pieces. This is always a risk with plique a jour, however, this happened just before the workshop shut the Friday of the bank holiday weekend; therefore, I couldn't refill this piece until the following Tuesday.

Dropped out enamel

Dropped out enamel
Over the bank holiday weekend, I took the pieces home and decided to do the next steps at home. I pickled all of the pieces so that they were clean.

Clean pickled brooches
After this, I oxidised them using a Platinol solution. In previous tests, I left the pieces in for an hour, and they turned out as I wanted. I kept these in for 40 minutes and then thought they may need a little longer in areas, so I put them back in the solution. I kept them in for around another 20 minutes, however, they had over-oxidised as they started peeling off. This hadn't happened before, and I'm not sure why it did, as I had kept them in the solution for this amount of time before. Unless the solution was stronger than usual, but it should have been, as I measured it out. To fix this, I cleaned the pieces up and re-oxidised them.

Pieces in solution

Drying after being oxidised

Peeling oxidisation

Peeling oxidisation

Peeling oxidisation

Gold plating come off pin
Unfortunately, a couple of the brooches failed when attaching the pin. The steel was too hard for the delicate mechanisms. As a result of this, I decided rather than submitting broken brooches, to change these to a pendant. As this was approaching the deadline, I didn't have much time for this. I cleaned the pieces up and drilled 1.6mm holes in them.

Removed mechaisms

Cleaned up

Holes drilled for pendant
I then re-fired these after I cleaned them up and sandblasted to make sure the glass is properly fused. After this, I oxidised. Unfortunately, the Platinol turned patchy in certain areas of the pendants, and I am not sure why. This could have been if they weren't clean enough. Because of this, I re-cleaned and pickled the pendents to start again and made sure they were extra clean. After this sandblasted and re-fired again.

Re firing pendants

Oxidised pendants

Stripping patina

Cleaned pendants

Re fired

Re fired
I then went to oxidise them again and the results were much better. There is still a couple areas that weren't as good as when I did tests, however it was better than before. I followed by polishing these with Renaissance wax.
I went to Abakan to find some cord to use for the pendants. Unfortunately, they only had this thickness, which was too thick for the hole I drilled, or embroidery thread, which is too thin. They also didn't have any matt cords, so I had to get what I could, as this was last minute. I made jump rings to connect the cord. These ideally would be black, however, I didn't have the time to do this.

Oxidised again

Oxidised pieces back

Oxidised pieces front

Polished pieces front

Polished pieces back

Adding jump ring

Bought cords
Final Pieces
'Azizam' عزیزم
'Azizam' is the name I have chosen for the collection. The meaning of this is 'my dear' in Farsi, the language spoken in Iran. As the context of this collection is very personal, this title reflects this. This project has been an attempt to positively channel the discovery of finding out my new identity. Regarding this situation, there are many challenges and difficulties around it which my adult self and inner child are still processing. This title itself and the collection is a dedication to my inner child and the struggles she has faced with growing up without her father and never knowing who she truly was, until now.


Pricing
When calculating my hours worked on the pieces, I worked it out per day I was in the workshop. This came to 22 full days and 5 half days. This included minus an hour a day for lunch and 3 more hours for Wednesday afternoons when the workshop was closed for meetings.
For a full day, it was 5 hours of work
For a half day, it was 2.5 hours of work
This total is 119.5 hours of work.
However, one of the pieces I made, I decided not to submit. These meant I was submitting 4 final pieces rather than 5. Therefore, when calculating hours worked, I think it would be appropriate to cost to make 4 pieces instead of 5. To do this, I will divide the total time of 119.5 hours by 5, which is 23.9. I will multiply this by 4, which is 95.6 hours worked on the final 4 pieces I have submitted.
I used the Excel spreadsheet provided by CJ to work out my hourly rate. This came to £34.80. However, when looking at the Artists Union website, the hourly rate for graduates is £27.08. I am not sure if the Excel result is accurate due to whether I have inputted the data correctly or not.

Artists union
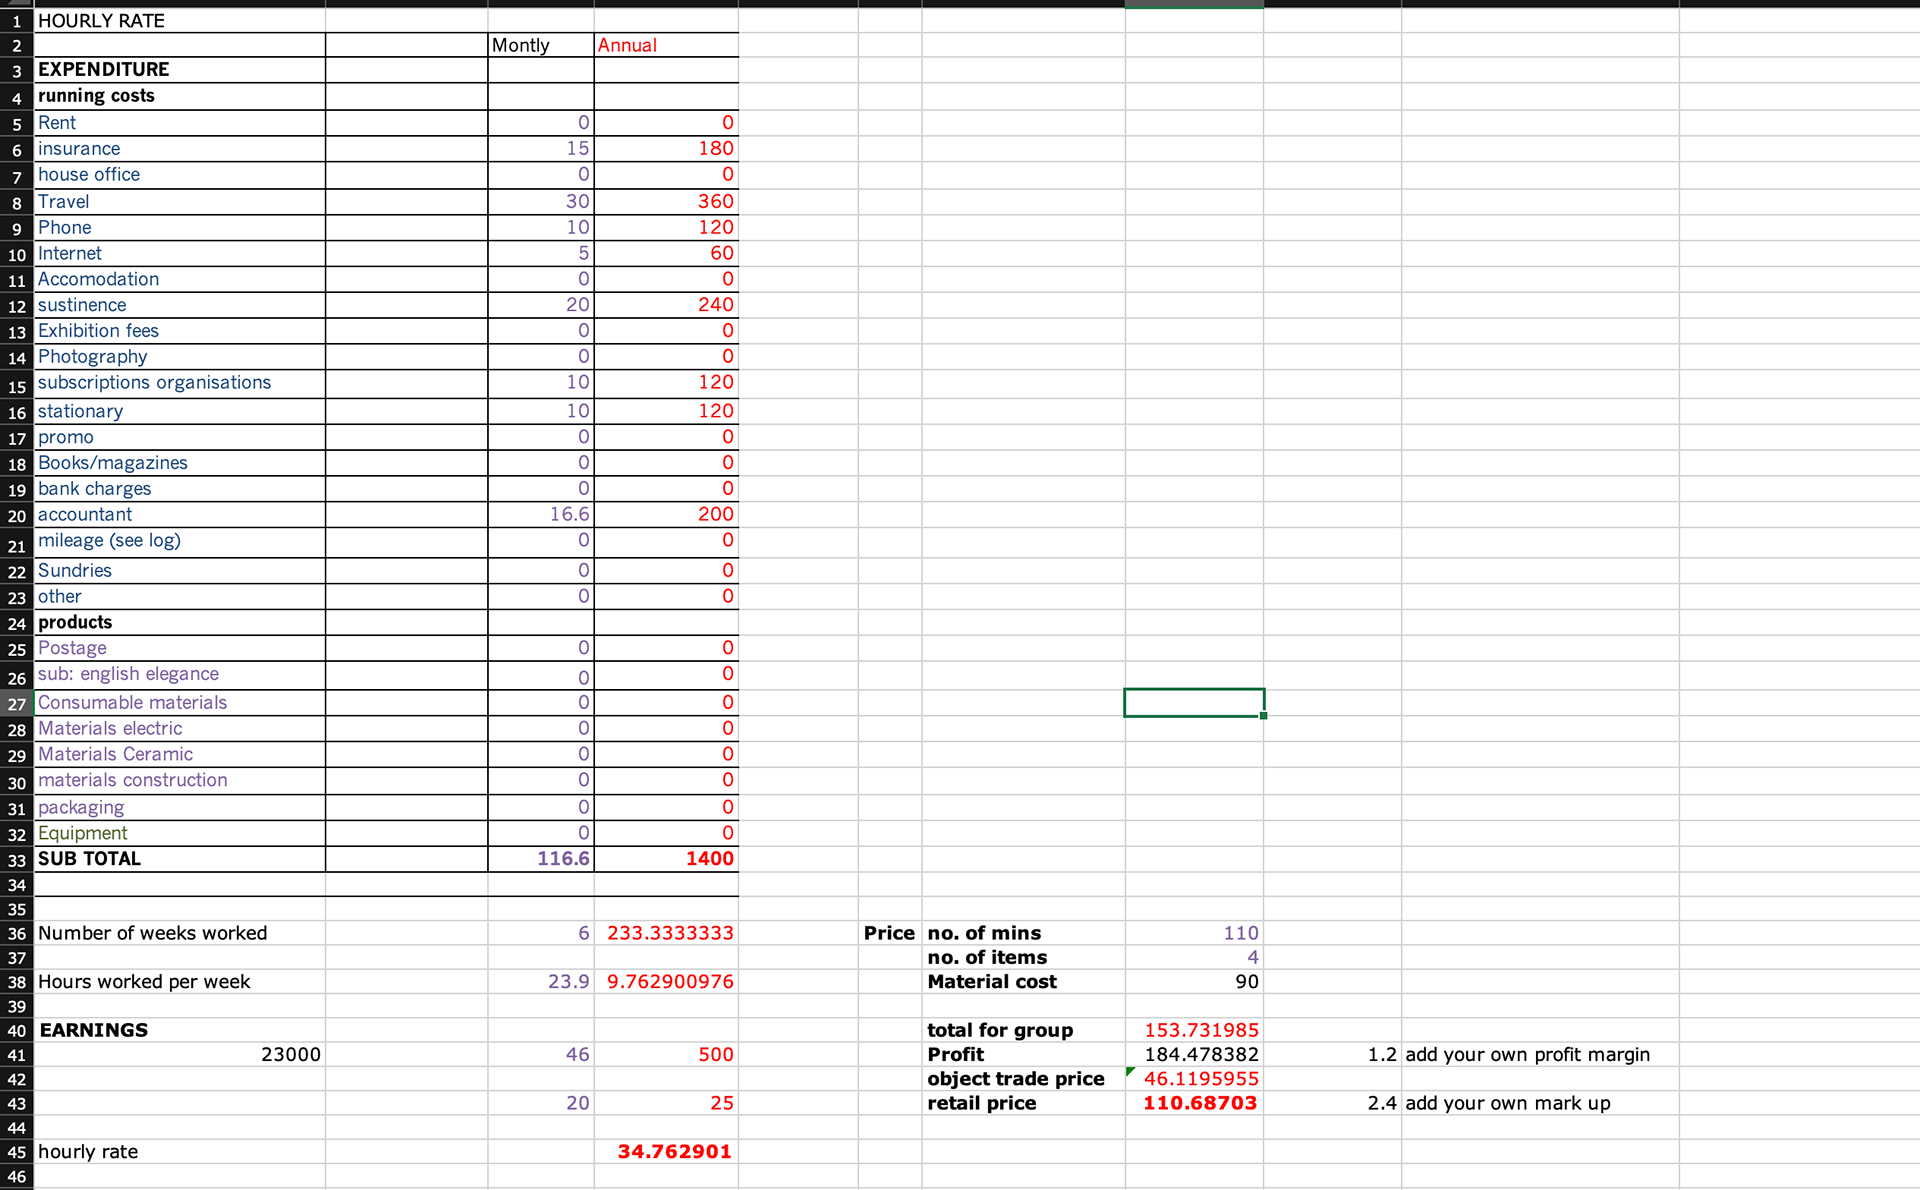
CJ spreadsheet
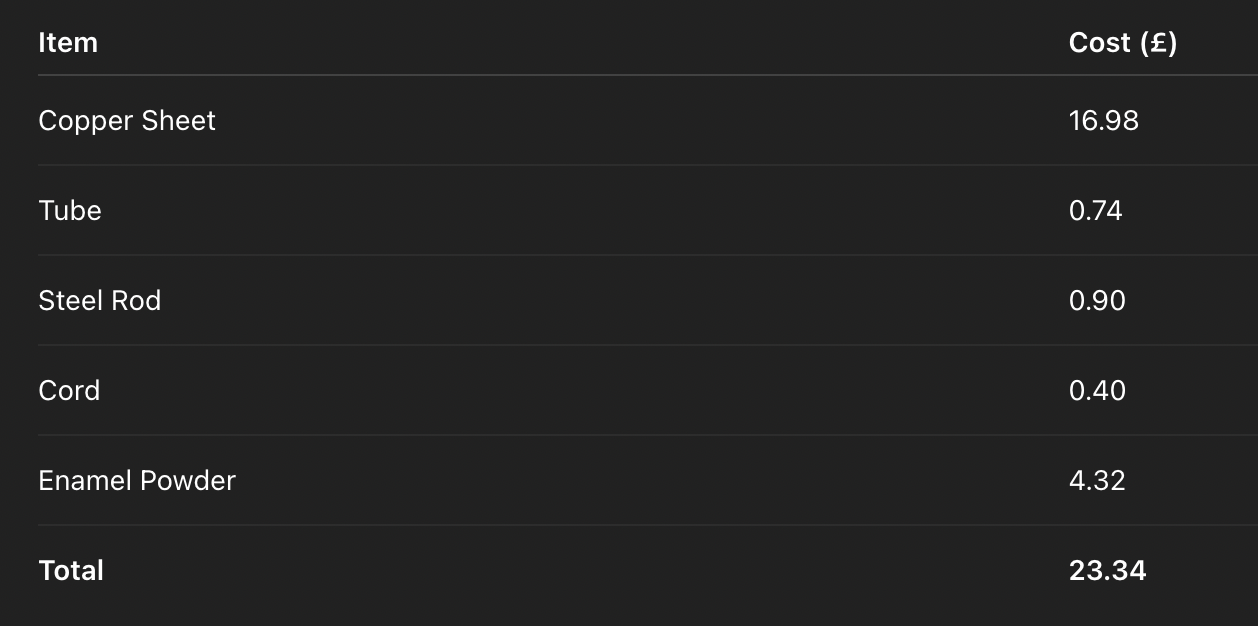

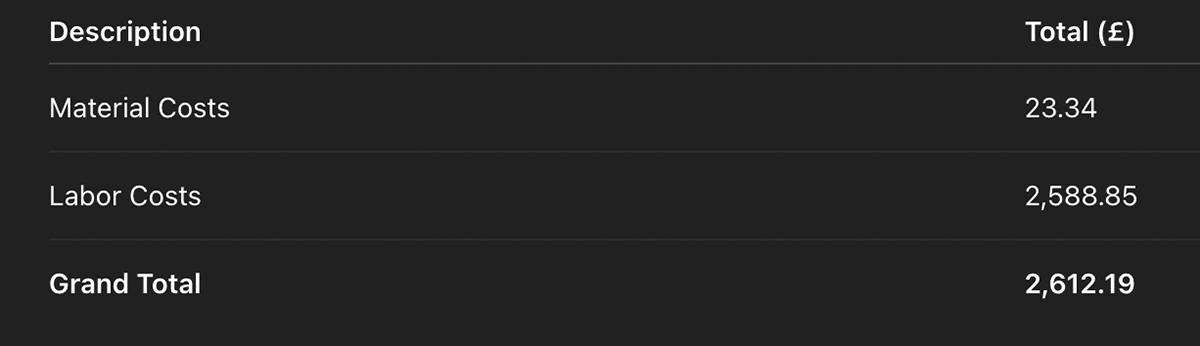
Adding the labour cost and material cost to make all four pieces, it came to a total of £2,612.19.
After dividing this by 4, each piece costs £653.04.
Context Video
Below is my context video. This task pushed me out of my comfort zone as Im not confident in using video editing apps or with recording good quality footage, etc.
Reflection
This collection was inspired by the discovery of my heritage during my second year of study. A DNA test revealed that I am half Iranian/Turkish and half Mancunian. This discovery prompted me to delve into Persian culture, drawing inspiration for my jewellery designs. It provided a creative outlet to process this significant personal situation. The discovery was also emotionally challenging. My racial identity shifted overnight, leading me to question aspects of my life and identity. Despite the initial upset, I found that many traits and interests aligned with my newfound heritage, offering a sense of coherence and understanding. The central theme of my work reflects the contrast of a hard exterior with underlying complexities. This concept resonates with my personal experience and aims to invite viewers to find connections within their own lives.
In crafting my pieces, I employed various techniques, including soldering, piercing, filing, forming, and Plique-à-jour. I intentionally selected intricate methods to challenge my skills and push my creative boundaries. While this approach was rewarding, it also introduced stress, particularly within the demanding university environment. Nonetheless, it facilitated significant learning and growth throughout the project. The making process presented numerous challenges, especially in the final weeks. I documented errors and their resolutions in my portfolio, demonstrating resilience and adaptability. Although the pieces did not meet my initial standards, I am proud of the outcomes, considering the obstacles faced. I tend to be self-critical, but this experience reminded me of my ongoing learning journey.
Reflecting on my final pieces, I recognise areas for improvement. The oxidation technique, for instance, proved less durable than anticipated, leading to various issues. Moving forward, I aim to explore more practical methods suitable for commercial viability. Additionally, I plan to further develop Plique-à-jour, conducting more tests to enhance enamel clarity. I also aspire to refine my filigree work, creating pieces that incorporate this technique. Throughout this project, I've embraced the principle of 'less is more,' moving away from overcomplicated designs towards more refined, contemporary jewellery forms.
After completing Unit X, my primary goal was to refine my skills by thoroughly testing each aspect of the process, both individually and as a complete piece. I dedicated time to this approach, and while I achieved positive results, I still encountered challenges during the creation of my final pieces. This was particularly frustrating, as I had invested considerable effort in testing and preparation. However, I recognise that such setbacks are part of the learning process. Each experience, whether successful or not, contributes to my growth as a maker.
I understand that the level of skill I expect comes with time and continued practice. These challenges have reinforced my commitment to learning and improving, and I am confident that each project brings me closer to achieving my goals. Creating these pieces allowed me to process complex emotions related to my heritage positively. It has ignited a passion to explore this concept further, with numerous avenues to pursue. Looking ahead, I aim to enhance my technical skills, ensuring I become a proficient jeweller capable of creating handcrafted pieces with a solid foundation in metalworking.